
Lattice Schema Registry
The Lattice Schema Registry (LSR) is a centralized registry that tracks schema definitions for Lattice integrations. Publish your schemas to use them in your Lattice integration, such as custom task definitions that express your platform’s capabilities.
The LSR accepts schemas written in the Protobuf IDL. Protobuf is supported by a variety of language-specific plugins, so your schemas can be used to create both REST and gRPC integrations using most major programming languages.
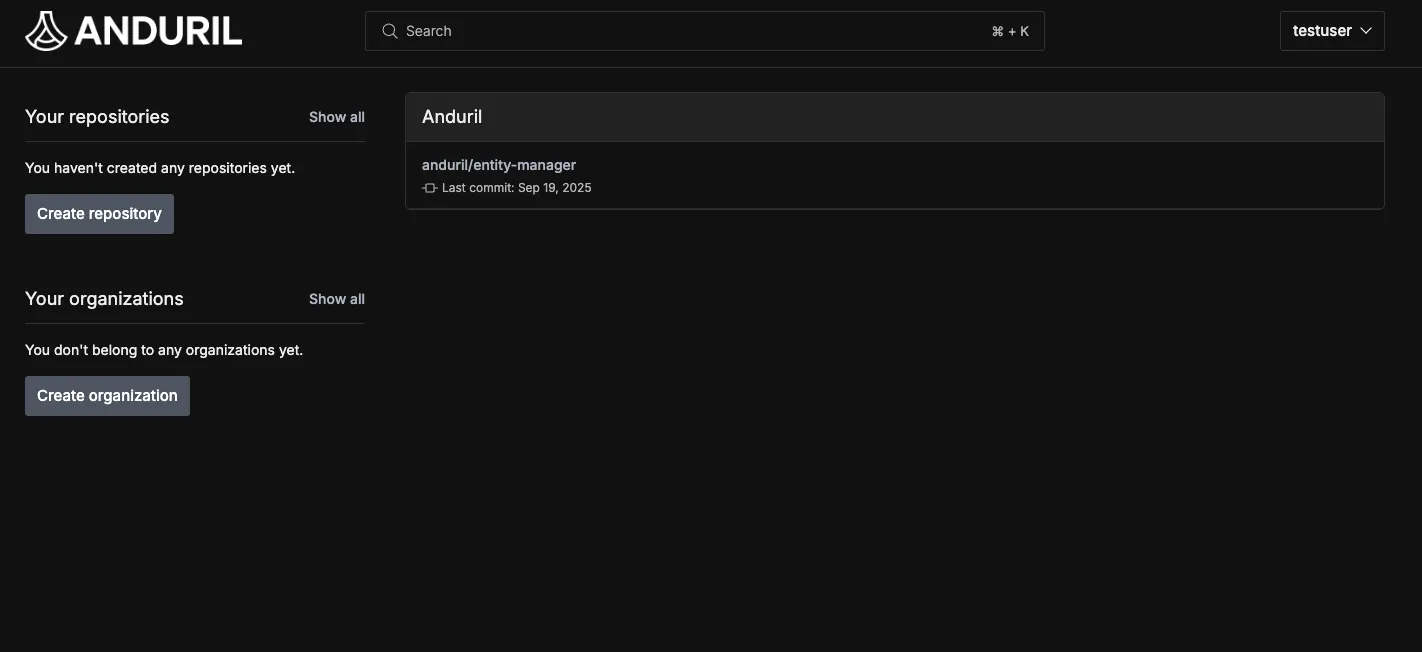
In the following sections, you learn how to set up your account in the Lattice Schema Registry, create a repository, and publish your custom schemas.
Before you begin
- If you don’t have a Lattice Developer login, request to join the Lattice SDK Developer program.
- Your user account in the LSR is created the first time you log in.
- Review how to define a custom task to understand best practices for authoring Protobuf schemas before publishing them to the registry.
Set up your registry
Open the Schema Registry dashboard, then do the following:
Log in using your Lattice Developer SSO.
- Your LSR account is created when you log in for the first time and is automatically provisioned as a member of the organization associated with your Lattice Developer SSO.
- Organizations in the LSR are created when the first associated Lattice Developer logs in. The first member of a new organization becomes its default admin.
From the organization dashboard, choose Create Repository:
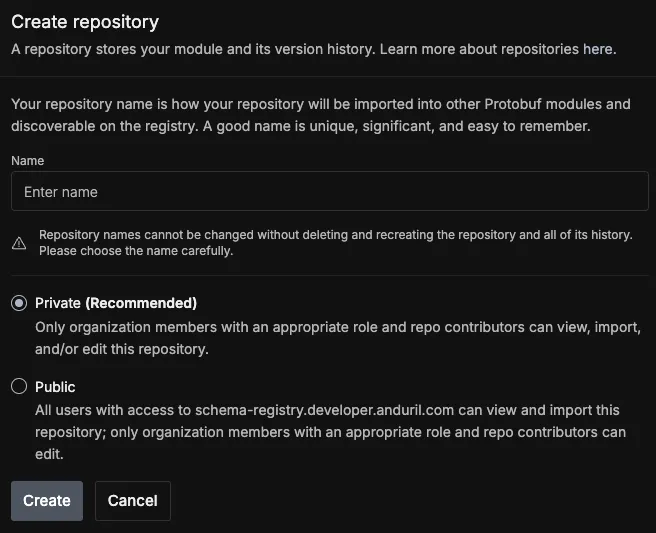
In the modal, enter your-repository for the repository name, and select Private for visibility. Then click Create.
Treat your schema definitions as a public interface for your integration.
- The LSR does not support ITAR specifications, regardless of repository visibility. Do not use the registry to store any classified or export-controlled information.
- Public repositories are visible to all users of the Lattice Schema Registry.
- Private repositories are only visible to organization members. Repositories are Private by default.
- All repositories, regardless of visibility, are readable for a subset of Anduril engineers. Do not include proprietary information that you would not share with an Anduril engineer.
Publish to the registry
After creating a repository, you can publish Protobuf schemas to the LSR. First, define your package and associated schemas in .proto files. Publishing your schemas to the LSR will automatically register these definitions for use in Sandboxes test environments. If you’re integrating with a production deployment, confirm this behavior with your Anduril representative.
To publish schemas to your repository, use the Buf CLI:
Authenticate with the LSR
When you authenticate with the LSR, you create a token that is scoped to your user.
From your account dropdown, navigate to Settings. Create a new token and save it. Export the token in your CLI:
Any time you use Buf CLI with the domain name schema-registry.developer.anduril.com, Buf uses $BUF_TOKEN to authenticate.
To confirm your token works, run:
Read more about ways to authenticate with the Buf CLI.
You’re now ready to start publishing schemas to the LSR:
Create a buf.yaml configuration file
The buf.yaml file defines how your modules are published. Create a buf.yaml file in the root of your protobuf directory:
This file defines where and how your schemas are pushed to the registry. View the full buf.yaml config spec for more options.
You can now use this custom definition with the Lattice SDK to send your data across the Lattice mesh.
Development loop
After you push your schemas to the LSR, you can use them in workflows that require a Type URL, such as registering a custom task in an asset’s task catalog. Test your workflow against Sandboxes test environments.
Schema definitions and updates automatically propagate to your Lattice Sandbox environments within 15 minutes.
Use the Developer Console from your Sandbox environment to validate your Task definitions. Publish an Asset that has the Task in its Task Catalog. Click on the Asset, then click Assign Task to view a list of available tasks. Select the relevant Task, and verify that the fields align with your updates.
Manage schema versions
When you need to iterate on a message without breaking existing consumers, release a new version of the package instead of editing the published one in place.
A package name consists of <namespace>.<pkg>.<version>, and a message’s fully qualified name is
<namespace>.<pkg>.<version>.<Message>. A published schema is a contract. Existing integrations that already
consume a message built from it depend on both the package name, as well as the field numbers in each message,
which consumers use to decode the message.
Adding fields is safe. However, renaming, reordering, changing a field’s type, or removing a field, is a breaking change. If a change results in a breaking change, LSR requires that you cut a new release instead.
You cannot make breaking changes while developing alpha, beta, and test versions.
This ensures that message types are backwards-compatible and that messages remain valid even if the definitions have not been uniformly updated.
If you must release a breaking change in development, create a new version, for example, v1alpha → v2alpha.
Create the new version directory
Mirror the existing layout. Each version lives in its own directory and gets its own package:
Copy the proto and bump the package
Copy <pkg>/v1/<file>.proto to <pkg>/v2alpha/<file>.proto, then change only the package line:
The version segment of the package must match the directory. This keeps the fully qualified names distinct
(<namespace>.<pkg>.v2alpha.<Message>), so v1 and v2alpha consumers never collide and can be served side by side.
Make your changes in v2alpha
Iterate freely—this is a fresh contract with no consumers yet. For example, you might add optional parameters to a message that previously carried none:
Verify with the Buf CLI
If the module is managed by buf.yaml, run the following from the root of your Protobuf directory:
Because v2alpha is a new package, running buf breaking against your published baseline does not flag it: the
v1 contract is unchanged, which is the point. When you’re ready, publish the new version with buf push.
Once other services consume a version, follow the standard proto3 evolution rules so you can keep adding to a message without releasing another version:
- Add new fields with new, never-before-used field numbers. Existing consumers ignore fields they don’t recognize, so this stays backwards-compatible.
- Never reuse or renumber an existing field number. Consumers decode by number, so reusing one silently breaks downstream consumers
- Never rename a field if consumers rely on the JSON or text name. JSON uses field names, so renaming a field breaks JSON consumers.
- Never change a field’s type, such as
int32tostringoruint32to its wrapper type. The wire encoding differs, so add a new field instead. - Reserve the number and name of any field you remove so they can’t be reused. This prevents a future field from accidentally reclaiming a retired number and colliding with old data.
- Prefer wrapper types such as
google.protobuf.UInt32Valueandgoogle.protobuf.FloatValueover bare scalars. Callers can then distinguish “unset” from an explicit zero, which lets you add optional parameters later without ambiguity.
When you remove a field, reserve its number and name:
Use tokens for automated workflows
For automated workflows, such as in a CI/CD pipeline, use API tokens to authenticate with the LSR:
From the LSR dashboard, select your username in the top-right corner to open the dropdown list. Choose Settings to open the setting dashboard.
Use the Create a token pane to create an API token.
The token is displayed only once and can’t be retrieved again. If you lose the token or it’s compromised, delete it and create a new one.
Set the BUF_TOKEN environment variable in your CI/CD environment:
The Buf CLI will automatically use this token for authentication. For more information, see Authenticating in CI in the Buf Developer Documentation.
What’s next?
- Use your published schema to create tasks in Lattice.